Learn automotive restoration skills in convenient workshops at the Automotive Restoration Institute.
About the Institute
McPherson College’s Automotive Restoration Program offers five-day, hands-on courses designed for professionals and hobbyists 21 years old+ (not intended for students).
Each class covers a specialized skill area, with limited enrollment for personalized instruction and ample equipment time. With this approach, no matter what level of skill you have, you will increase your restoration expertise. Due to the hands-on nature of the classes, participants will spend full days in the class and may only take one class per week.
Participants also receive guidance on sourcing tools, materials, and parts—and can often bring their own project parts to work on.
Registration is open
2026 Schedule
Week 1: June 1-5, 2026
- Babbiting
- Drivetrain
- Automotive Electrical
- Machining
- Paint
- Sheetmetal
- Automotive Trim & Upholstery
- Tune-Up & Diagnostic
Week 2: June 8-12, 2026
- Brake Systems
- Digital Parts Design and Printing
- Engine Rebuilding
- Paint
- Sheetmetal
- Small Parts Reproduction and Finishing Touches
- Automotive Trim & Upholstery
- Applied Automotive Trim & Upholstery
- Automotive Woodworking
Week 3: June 15-19, 2026
- Automotive History
- Drivetrain
- Machining
- Advanced Paint
- Advanced Sheetmetal
- Applied Automotive Trim & Upholstery
- Tune-Up & Diagnostic
*Advanced classes require having taken the intro class, either preceding weeks or a previous year
Costs
- Class enrollment(includes lunch): $1,400
- Dorm Room: $250, second person $50
- Optional Meal Plan (add breakfasts and dinners): $225
- Airport Shuttle (per person, each way to and from the Wichita airport): $35 per person
Cancellation Policy
- $100 per class any time after registration
- $250 per class after April 19, 2026
- Forfeit the entire cost of class after May 24, 2026
Lodging
On-Campus Option
- Dorm Room (single room including bedding and linens): $250.00/week
- Add a Second person in Dorm: $50.00
*If attending consecutive weeks, the dorms will be available for use over the weekend between those classes.
Off-campus options:
Hampton Inn, Hilton Hotel
200 N Centennial Dr, McPherson, KS
Instructions to book: Call Hampton Inn at 1-620-480-2990. Make sure to tell them that you are making a reservation under the McPherson College Auto Restoration Block.
- Standard Queen or King Room $109/night
Fairfield Inn & Suites, Marriott Hotel
2270 East Kansas Avenue, McPherson, KS
Instructions to book: Call Fairfield at 1-620-504-5353. Make sure to tell them that you are making a reservation under the McPherson College Auto Restoration Block.
- Double Queen or Single King Room $109/night
Candlewood Suites, IHG Hotel (*brand new construction!)
2229 E. Kansas Ave. McPherson, KS
Instructions to book: Call Candlewood Suites at 1-620-718-2053. Select Reservation Desk. Make sure to tell them that you are making a reservation under the McPherson College Auto Restoration Block.
- King Studio Suites (Each room has a King Bed) $95/night
- King Suites (living room and a bedroom) $105/night
Holiday Inn Express & Suites McPherson, IHG Hotel
2302 Plaza E Pl, McPherson, KS
Instructions to book: Call Holiday Inn at 1-620-241-5566. Make sure to tell them that you are making a reservation under the McPherson College Auto Restoration rate.
- King Standard $94/night
- Double Queen $104/night
- King Suite $114/night
CONTACT
Classes
These classes are designed for professionals and hobbyists 21 years old+ (not intended for students). Everyone comes with different skill levels and knowledge, so they will build from the basics. Classes will start with brief histories and fundamentals of the knowledge needed, but the goal is to get students into the labs as soon as possible.
This course takes up the history of the automobile and the industry surrounding it, largely from a business, labor, and social perspective. The course covers the early development of the automotive industry in Europe, the United States, and the key figures that established the large manufacturing firms which changed not just the way people move around, but the way in which we interact with each other. Plenty of time is spent on byways in the historical world, including eccentric but visionary tinkerers, engineers who largely stayed in the shadows, racers and drivers who achieved incredible feats.
The course also is a good introduction to the practice of professional research in automotive history. Automotive history is much more than researching a single car. It is understanding the broader context of the designers, engineers, users, and the supporting infrastructure that made the cars what they were. Students enrolled in the course will spend hands-on time in the College library and archives exploring materials and learning not just how to research, but also different research methods and sources for automotive history. At the end of the course, each student will present what they have learned in the course of the week and suggest areas that they want to pursue further.
Day 1: Lectures: Merilly We Roll Along / Antecedents
Day 2: Lecture: Thar Be Giants, The Automobile and the Great War, Library Introduction
Day 3: Lecture: The Internationalization of the American Automobile, The Post War Automobile, Library time
Day 4: Lecture: Detroit in Decline and the Rise of Japan and China. Afternoon: Library time, presentation preparation
Day 5: 8-10 minute presentations.

Discover the fundamentals of automotive electrical systems. Gain knowledge of the use of basic electrical tools such as voltmeters, ammeters, and multimeters. Included in the class is an introduction to oscilloscopes for advanced diagnostics. Explore and practice diagnostics, troubleshooting, and repair of automotive DC circuits. Learn by hands-on practice finding opens, shorts and miswired circuits, etc. Also, repairs of starters, generators, alternators, spark ignition systems, and wiring. Learn and understand the necessary theory of current, voltage, and Ohm’s law to diagnose and repair these components. Gain an understanding of electricity without complicated math or mythology.
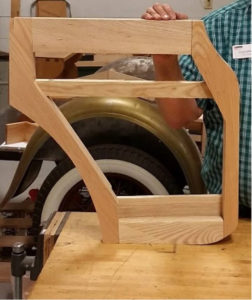 Automotive woodworking usually involves replacing sections of rotted wood on pre-‘30s cars or making a “woodie” from scratch. This class will focus more on the wood replacement topic than scratch-building a body, but most techniques used for the former also apply to the latter.
During this class, we will make a 1929 Stutz Blackhawk rear door frame from plans (a project representative of most construction in automotive coachwork from pre-1930). This project will require project planning, material selection, glue-ups, woodworking machines, hand tool use, and finishing. The completed door frame will be perfect for making a skin in advanced sheet metal, by the way. No previous woodworking experience is necessary.
A course for all things related to vintage brakes. From mechanical to hydraulic systems, this course covers the rebuilding, adjustment, diagnosis and repair of all types of braking systems. Students will work on projects provided by the College, including mechanical brakes on a Model A Ford, early Lockheed style hydraulic drum brakes, Bendix dual servo type brakes, and finally disc brakes. Master cylinders, power boosters, hydraulic lines and hoses, wheel bearings and related components will be discussed and real-world examples provided both in a classroom and shop environment.
Students may bring brake components for rebuilding, though are not required to do so.
Day 1:
- Classroom: Fundamentals of braking, mechanical brakes.
- Lab: Model A Brake Adjustment
Day 2:
- Classroom: Brake hydraulics, lines and hoses, brake bleeding.
- Lab: Hydraulics, early Lockheed drum brakes
Day 3:
- Classroom: Drum Brakes, Wheel Bearings.
- Lab: Bendix dual servo drum brakes
Day 4:
- Classroom: Disc Brakes, Power Boosters.
- Lab: Disc Brakes
Day 5:
- Conclusions, brake testing and diagnosis.
Participants will learn how to produce parts utilizing Onshape 3D design software. The necessary steps to reproduce rare, nonexistent, and custom parts will be covered. We will utilize 3D printers, but will also look at other fabrication processes. Each student will have the opportunity to design parts and tools that will then be 3D printed.
Students are also welcome and encouraged to have personal projects that they can design and print. No prior 3D modeling or 3D printing experience is necessary, but basic computer skills such as using the mouse is helpful.
- 3D printer and slicer basic operation
- Designing, printing and preparing patterns for sand casting and lost PLA investment casting.
- Designing metal shaping tooling including dimple dies, forming dies, and bead roller dies.
- Design parts that can then be produced utilizing CNC fabrication processes such as milling, plasma cutting, routing, etc.
- Basic CAM (computer aided manufacture) for milling operations
- 3D printer and filament types
Each morning and afternoon will begin with a lecture, demonstration, and discussion time. After this, students will have time to work on individual projects. During each day, we will also include a demonstration of tools we make or process that 3D drafting is the foundation of.
The demonstrations include:
- 3D printed tool testing – tap holder
- 3D printed dimple dies
- 3D printed bead roller dies
- 3D printed stamping dies
- Operating a CNC mill
- Sand Casting using a 3D printed model
Day 1:
- Onshape Introduction Lecture/Discussion
- Lab – Personal Projects
- 3D Printing Lecture/Discussion
- 3D printed tool demonstration and Lab – Personal Projects
Day 2:
- Sketch Tools Lecture/Discussion
- Lab – Personal Projects
- Forming Dies Lecture/Discussion
- 3D printed dimple dies and bead roller dies demonstration and
- Lab – Personal Projects
Day 3:
- Feature Tools Lecture/Discussion
- Lab – Personal Projects
- Custom Features/Navigating/Casting Lecture/Discussion
- 3D printed stamping dies demonstration and Lab – Personal Projects
Day 4:
- Surface Modeling Lecture/Discussion
- Lab – Personal Projects
- Drawings/Filaments Lecture/Discussion
- CNC mill demonstration and Lab – Personal Projects
Day 5:
- Printer Types Lecture/Discussion
- Sand Casting with a 3D printed pattern and Lab – Personal Projects
- Lab – Personal Projects
Computers, printers, and basic measuring tools will be provided for participants. If designing a personal project I would recommend bringing the actual item, relevant measurements or a measured drawing.
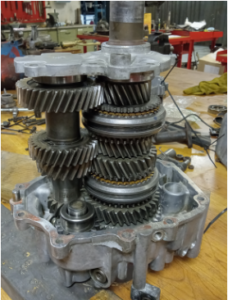
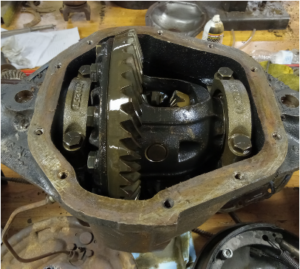
This class starts with the theory and operation of drivetrain components, including clutches, manual transmissions, drive shafts, differentials, and rear ends. After covering the functioning principles, students will have the opportunity to go through the rebuilding process in the lab. Provided lab projects cover a wide range of years and technologies. (1920’s – 1970’s and beyond) Students will also have the opportunity to install a transmission and clutch assembly on a stand-mounted engine. Participants have the opportunity to bring in personal drivetrain components that they can work on during lab time. Throughout the week, we will cover disassembly, cleaning, inspection, measurement, reassembly, and setup for drivetrain components.
- Clutch assembly theory diagnosis, and repair
- Driveshaft and torque tube theory diagnosis and repair
- Manual transmissions – sliding gear to synchronized
- Rear end and differentials – Banjo to Hypoid rear ends
Note that students can utilize all the lab time working on personal projects or desired drivetrain components.
Day 1:
- Manual Transmission Lecture/Discussion
- Model A Transmission Lab
- Clutch and Linkage Lecture/Discussion
- Manual Transmission Lab
Day 2:
- Differential Lecture/Discussion
- Rear Axle Lab
- Axles and IRS Lecture/Discussion
- Rear Axle Lab
Day 3:
- Banjo Rear Ends Lecture/Discussion
- Transmission Removal Lecture/Discussion
- Lab
- Driveshafts Lecture/Discussion
- U-Joint Lab
Day 4:
- Model T Transmission and Axle Lecture/Discussion
- Lab
- Overdrive Lecture/Discussion
- Lab
Day 5:
- Odd Drivetrains Lecture/Discussion Lab
- Lab
Basic drivetrain specialty tools and hand tools are provided. Safety glasses, hearing protection, and rubber gloves are also available. Students will need to provide parts for any personal projects that they work on during the week.
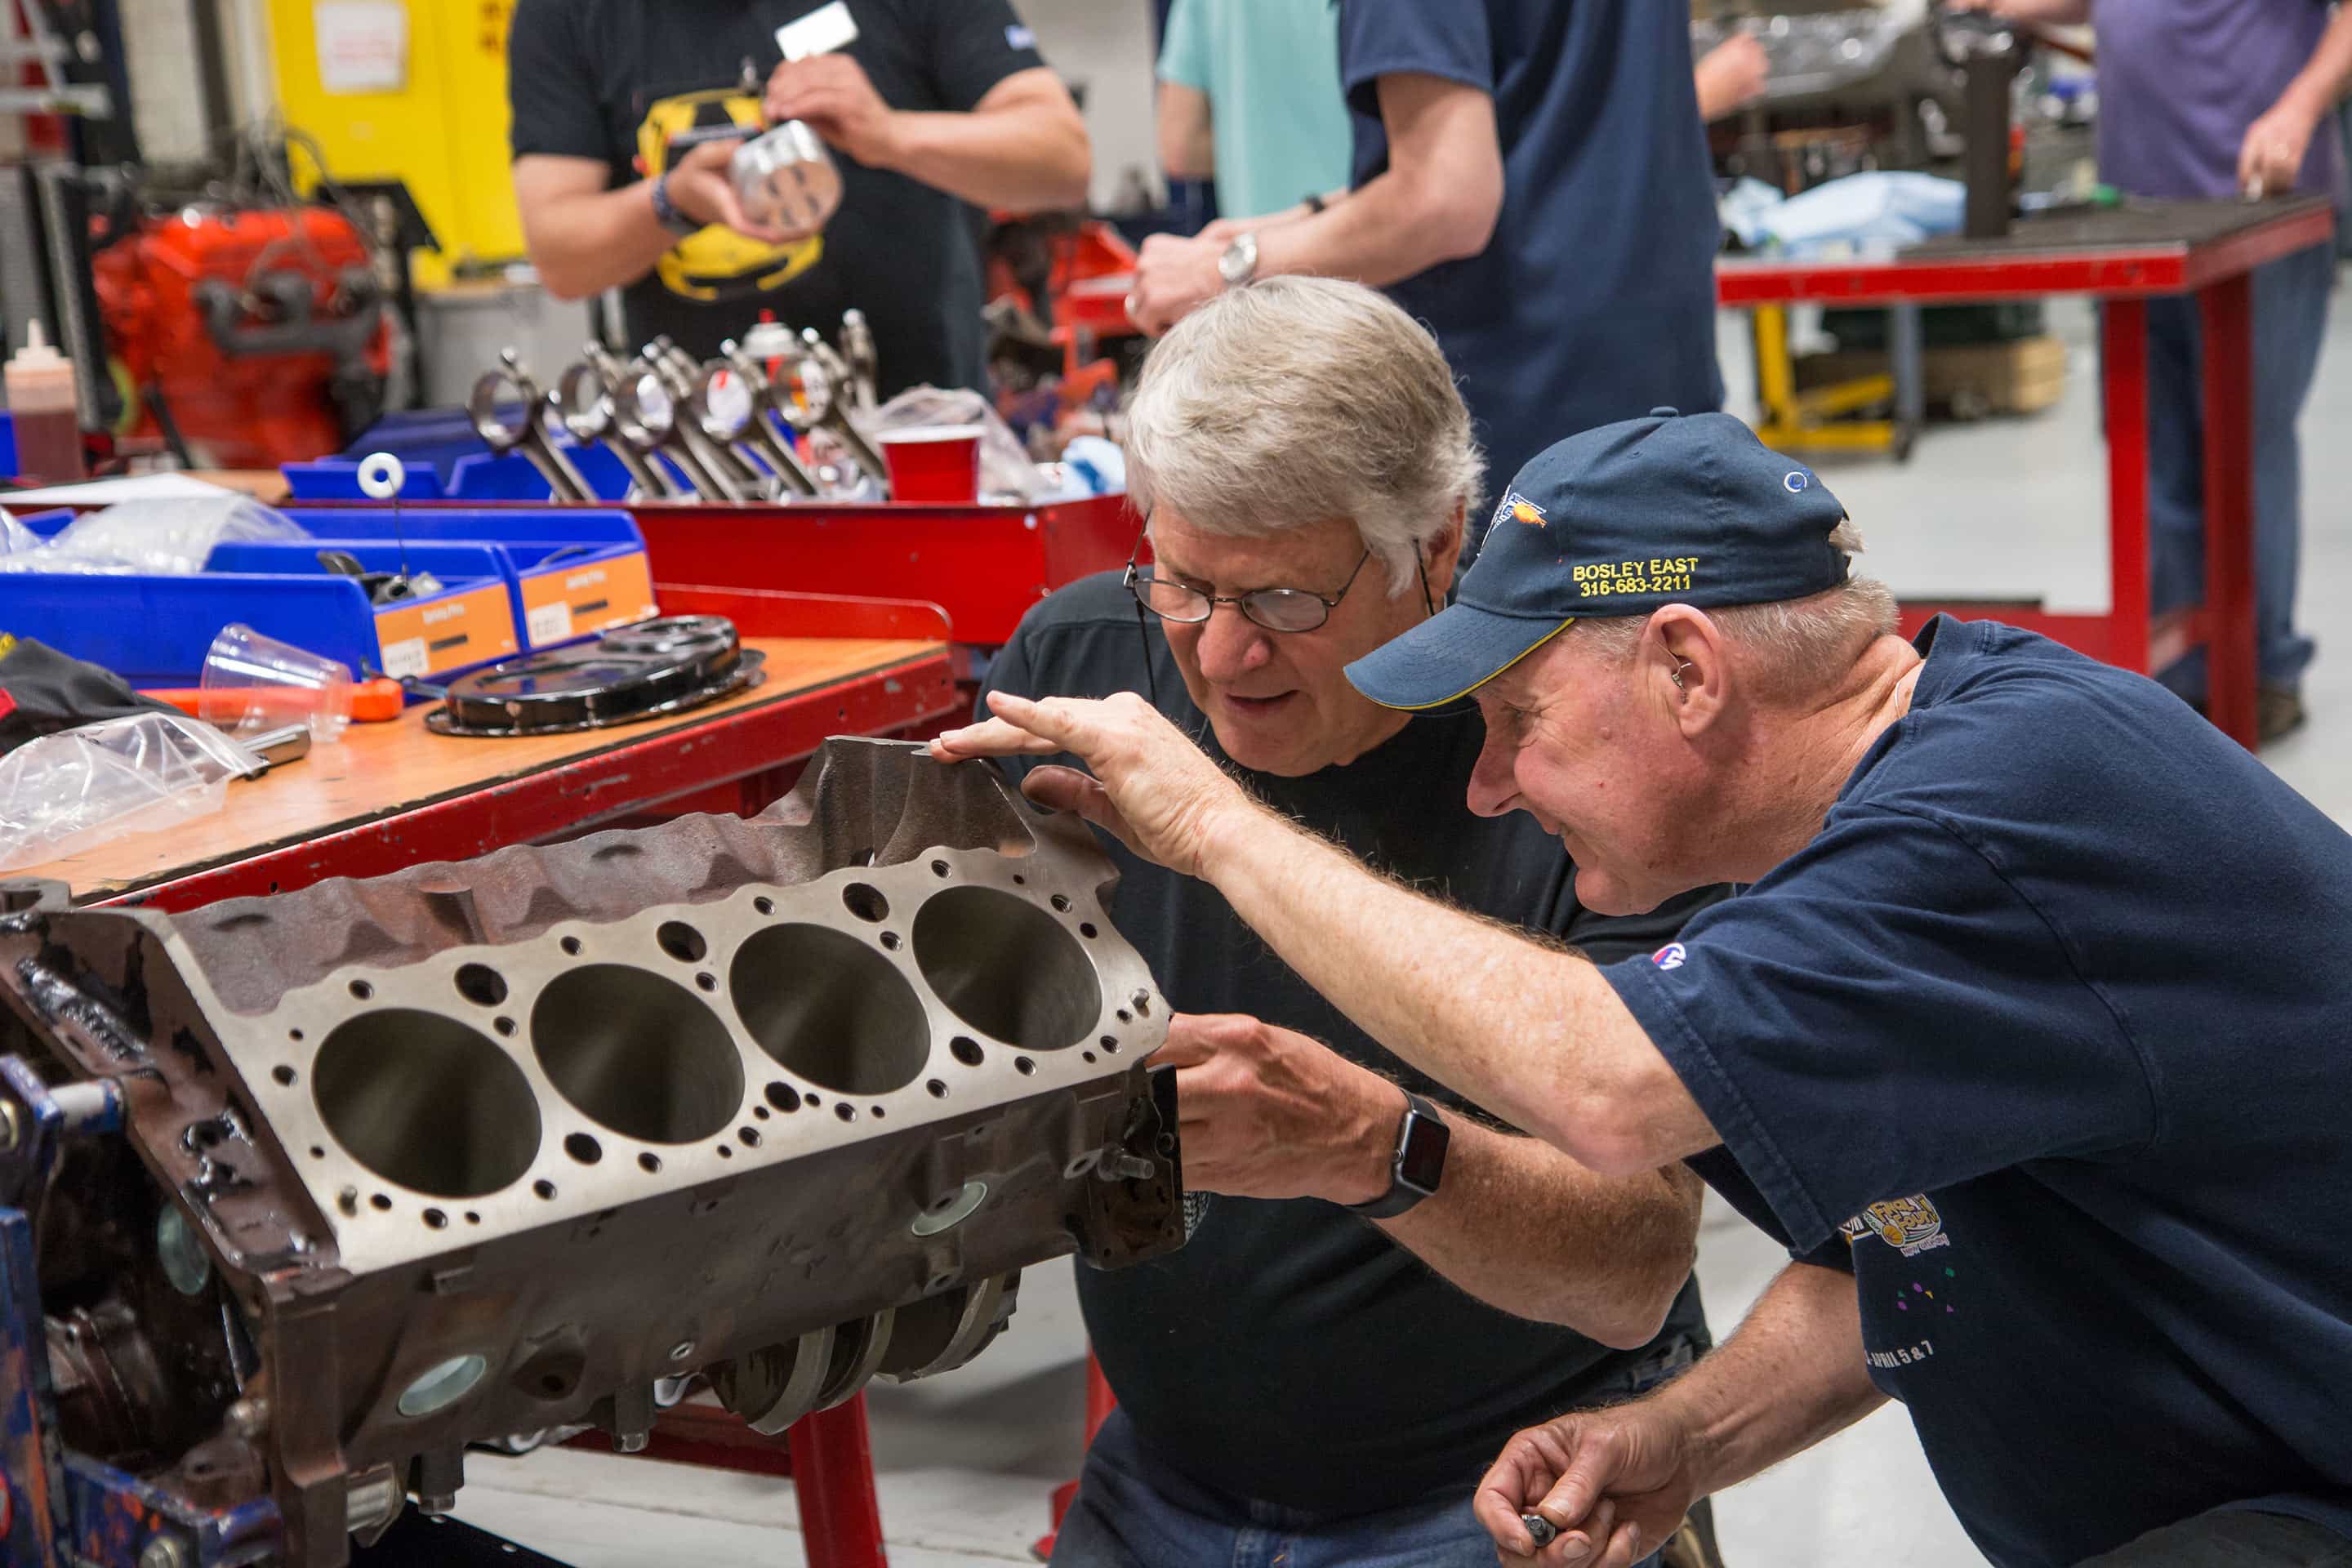
Most engines produced before the mid-1930s used poured Babbitt bearings for their main bearings and connecting rod bearings. When done properly, rebuilt babbitted engines can be just as reliable today as they were when they were new.
In this course, we’ll cover the following: basics of Babbitting, different types of Babbitt, different types of equipment, removing old Babbitt, pouring main bearings, pouring rod bearings, machining main bearings, machining rod bearings, setting and cutting thrusts.
We’ll perform the above operations on two different engines, using a currently-produced modern set-up as well as original 1920’s Kwik-way equipment.

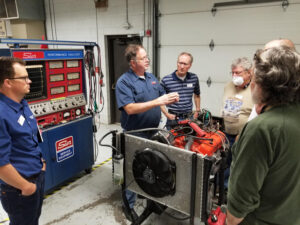
This hands-on engine rebuilding course is designed for hobbyists. It begins with diagnosing engine problems, focusing on mechanical issues to identify necessary repairs. After diagnosis, students will learn proper disassembly, inspection, and measurement techniques to determine the required machine shop operations. Participants will then move on to correct engine assembly, verifying clearances and adjusting components to factory specifications as needed. The course concludes with running one of the rebuilt engines, emphasizing proper setup, startup, and break-in procedures. Engines and parts will be provided. Due to the pace of the course, outside projects cannot be accommodated.
Day 1:
- Introductions
- Refresh on the operation of the four-stroke engine
- Diagnosis of the engine looking at the mechanical health.
Day 2: With engines provided.
- Disassemble
- Measure, and analyze wear areas on provided engines
- Make decisions on needed machine shop operations
- Develop a parts list
Days 3-4:
- Assemble cylinder heads
- Install cam bearings and cam
- Install crankshaft
- Install pistons
- Install heads
- Install valve train
Day 5:
- The class will do setup on one of the engines that was rebuilt in the class.
- Startup and break in the engine on the dynamometer or run-stand.
Learn how to get your classic running smoothly when it doesn’t start, and how to keep it that way! This class focuses on three key diagnostic and repair areas: mechanical, ignition, and fuel systems. While primarily using ‘60s engines for demonstrations, you’ll see how the technology applies across different generations of engines.
We will begin by troubleshooting the engine’s mechanical condition and verifying its integrity through compression and leak-down testing. These fundamentals will serve as the foundation for the rest of the course.
Next, we will explore the basic operation of the ignition system and the interaction of its components. Diagnostic procedures will utilize a range of tools, from engine scopes and digital multimeters to simple test lights. Topics will include inspecting and adjusting ignition points, ignition timing, vacuum advance, and mechanical advance.
Once the ignition system is set, we’ll move on to the fuel system. You will learn how the basic components of the carburetor work together to ensure the proper fuel mixture. By disassembling and reassembling carburetors, you’ll gain hands-on experience with bench adjustments and repair techniques. After this, we’ll install the carburetors for final adjustments and test them on a running engine. Additionally, you’ll learn to use a gas analyzer and other basic tools for precise tuning.
Day 1: Introduction, fundamentals, basic engine mechanical diagnostics
Day 2: Ignition Systems
Days 3-4: Carburetor and Fuel Delivery
Day 5: Conclusion
 This class is designed to teach the basics of operating a toolroom lathe to make replacement parts for your project vehicle. The first day or two will be heavy on classroom time to build knowledge and transition to mostly machine-time as the week progresses. We will make at least three projects, which are representative of common repairs needed in restoration. No prior machining experience is required.
Your instructor for this class will teach you to:
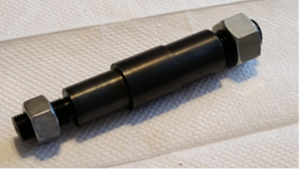
- Use a Southbend toolroom lathe to make cylindrical parts – we will make: (1) a 5-step 4140 steel shaft with external threads on both ends, (2) a 2-step 4140 steel shaft with internal and external threads, and (3) a bronze bushing
- Precision measure with an outside micrometer, depth micrometer, Vernier caliper, Vernier height gauge, and telescoping gauges
- Grind a high-speed steel tool to use on the lathe
- Single-point thread on the lathe (including left-hand threads)
- Drill and bore on the lathe
- Power tap on the lathe
- Oxide surface-finish steel
- Read blueprint drawings
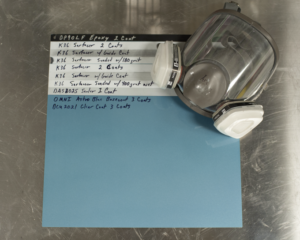
This class is designed to teach the fundamental principles in automotive paint application. Topics include sheet metal preparation, preparation of existing paints, application and use of primers, block sanding, application of topcoat paints, color/wet sanding, polishing, paint gun setup, air tool and compressor selection, and paint material usage on various parts of the automobile. Through the week, two test panels are painted with an emphasis on proper paint application techniques, which are administered through both classroom teaching and lab experience. The first test panel will be used for the application of single-stage paint, while the second test panel will be used for the application of basecoat and clear coat materials. This class aims to prepare participants to begin entry-level painting procedures and not larger, more advanced painting projects. Ample time is built into the week to answer questions related to the class work, personal projects, and for general paint-related discussions.
Students will need to supply their own organic vapor paint mask, but all other personal protective equipment and tools will be provided.
Day 1:
Lecture, test panel #1 preparation and spraying of initial primer layers.
Day 2:
Block sanding primer, spraying second coat of high build primer, final sanding on primer, spraying top coat materials.
Day 3:
Test panel #2 preparation, spraying of initial primer layers, block sanding primer, spraying of second coat of high build primer.
Day 4:
Final sanding on primer, spraying top coat materials, wet/color sanding and polishing of test panel #1.
Day 5:
Wet/color sanding and polishing of test panel #2 and/or completion of test panel #1.

The Advanced Paint class builds on the skills learned in the Introduction to Paint classes’ fundamentals of painting single-stage and basecoat/clear coat test panels. The Advanced Paint class focuses on more complex paint processes. The goal is to get time behind the paint gun on more challenging projects or to delve deeper into body work procedures. The first part of the week will consist of repairing a damaged test panel, while the second part of the week will consist of a project provided by the college. All five days will be spend in the paint lab.
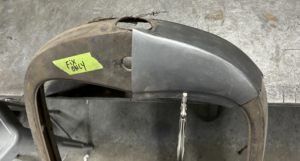
An introduction to the welding, cutting, and metal shaping processes used to repair antique automobile sheet metal. Learn oxy-acetylene welding, brazing, torch cutting, spot-welding, MIG and TIG welding, and plasma cutting. Explore metal shaping using hand tools, shrinker/stretchers, the English wheel, bead roller, and Pullmax machine. Dent repair, heat shrinking, lead body solder application, weld finishing, and patch panel fabrication/replacement are also covered.
Day 1:
Cover oxy-acetylene torch welding to familiarize students with the effects of heat on sheet metal. Explore metal shaping techniques to make one or more patch panels.
Day 2:
Learn TIG welding and MIG welding. Instructor demonstrates other processes from course description as desired by the class so that students can work on those independently.
Day 3:
Apply welding techniques to patch panels from Day 1. Learn how to grind and finish welds.
Day 4:
Explore heat distortion and how to correct it. Learn heat shrinking and dent repair.
Day 5:
Students can participate in a more involved patch panel exercise designed by the course instructor to bring together the lessons of the week. Alternatively, students can practice welding, they can work independently on a personal project, or the instructor can go over other processes from the course description as desired. A personal project is defined as something one person can carry into the building, such as a fender, door, hood, or similar object.
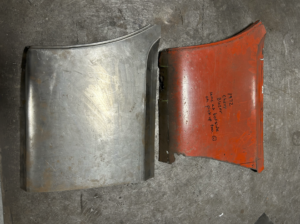
A highly individualized course of study for the serious hobbyist. Course content varies according to needs of participants. Topics covered typically include advanced metal shaping and fabrication techniques, copying shapes and making patterns, welding multi-piece panels. Extended time working on a personal project if desired. Must have taken Sheet Metal Restoration from Ed Barr. Students are encouraged to bring a project after consulting with instructor, Ed Barr [email protected].
Examples of personal projects include a selection of dented or rusty panels from a project car, a fabrication project based on a drawing or student-built wood buck, or similar reasonably sized undertaking. Students who are unable to bring a project can work with the instructor to design a course of study that will best meet their needs.
Daily Schedule: Personalized to each class participant.

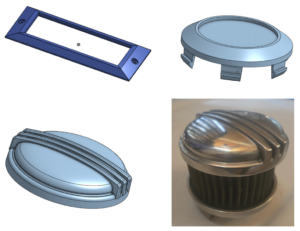
In this class, we’ll explore various ways to reproduce small automotive parts and methods that will allow you to do it at home. We will make patterns, sand molds, and cast parts in aluminum and bronze. We’ll reproduce plastic parts using rubber molds. We will stamp parts using simple, homemade dies. We will perform nickel-plating, copper-plating, and copy-cadmium plating. All of these processes will be taught with the home-hobbyist in mind. Participants are welcome to bring some parts in to work on. Please contact instructor for more information and your potential projects.
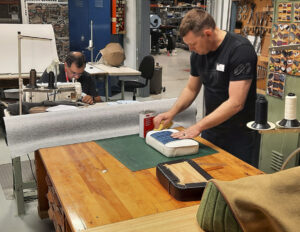 Participants will learn the fundamentals of automotive upholstery restoration and replacement. Industrial sewing machines will be used to learn the basics of constructing interior components such as seats (including various types of seams, piping, & seat cover styles), and door panels. To learn the construction techniques, a packet of sewing exercises will be given to each participant. Each exercise will be demonstrated by the instructor and then participants will be given time in the lab to practice with the instructor’s guidance. After the exercises are completed, participants will be given the opportunity to design and construct a small seat cushion. In addition to lab time, time will also be spent in the classroom going over the history and various materials and processes (e.g. upholstery fabrics, tools, foundations, pattern making, headliner installation) of automotive trim work.
 Day 1:
Morning
- Classroom: Automotive Interior Design History
- Lab Demonstration: Sewing Machine Setup
Afternoon
- Classroom: Sewing Basics
- Lab: Single Reinforced and French Seam Demonstration
Day 2:
Morning
- Classroom: Automotive Trim Cover Materials
- Lab: Piping Demonstration
Afternoon
- Classroom: Suppliers, Automotive Trim Tools, Seat Foundations
- Lab: Seat Cover Panel Demonstration
Day 3:
Morning
- Classroom: Pattern Making and Assembly Sequences, Seat Cover Styles
- Lab: Work Time
Afternoon
- Classroom: Custom Seats
- Lab: Roll and Pleat Demonstration
Day 4:
Morning
- Classroom: Headliner Installation
- Lab: Small Door Panel Demonstration
Afternoon
- Classroom: Mercedes- Benz 300 S Project
- Lab: Work Time
Day 5:
Lab work time!

Participants in this class will spend their week exclusively in the trim lab fine-tuning their automotive trim and upholstery skills. Because of the expectation that participants have sewing and upholstery experience before enrolling in the class, it is requested that participants will have taken the fundamental Automotive Trim and Upholstery class previously.
It is encouraged that participants bring a personal automotive trim project from home for this week, but it is not required.
Lab demonstrations and guidance during the week will be tailored to participant’s projects as needed.